Android ListView, Inefficient but Convenient
When I first began using Android, back in the Jellybean days, displaying lists of data from a data source had a lovely widget that you could easily use called ListView. This widget was exceedingly convenient, as it provided an onItemClickListener for easy data interaction. onItemClickListener came back with the View that was tapped and the position in the data the view represented, allowing you to easily modify both.
The ListView has a major drawback: for every data item in your list, a View is generated. This won’t be an immediately obvious problem if you either have very few pieces of data or your views are light-weight. However, if you have a very large dataset or if you start to use heavier widgets (such as ImageViews), you can easily create a massive and sluggish UI that eats your memory and slows your device while not even being visible on the screen. Luckily, there’s a better way, the RecyclerView.
RecyclerView – The Efficient Alternative
The RecyclerView widget takes a much more practical approach: it will only inflate enough View objects to fill the screen (plus or minus a couple for smooth scrolling). As you slide up and down in the list, views are recycled as they exit the screen, reinflated with new data, and pushed back into the other end of the widget where you’ll see them. This solves the problem of mass data sets and heavy widgets crashing your app or making it slow to a crawl; however, this efficiency comes with a price: there’s now a disconnect between the View and the single piece of data (or datum) that it represents. Because of this disconnect, you have to write your own RecyclerViewAdapter to handle the data (instead of relying on the more generic ArrayAdapter, which worked very conveniently with ListView).
Additionally, the framework now enforces a pattern called the ViewHolder Pattern. In this pattern, a special class is generated that maintains the state of the View that displays a single piece of data. The ViewHolder class a static inner class, meaning that it’s memory light (the “static” portion of that is very important). The ViewHolder can also serve as a utility class, helping you handle interactions that affect pieces of data in the list.
Writing Your Custom RecyclerViewAdapter and ViewHolder Classes
The RecyclerViewAdapter is what provides data to a RecyclerView. Because of the strong adherence to the ViewHolder Pattern, there is a built in abstract class you must override as a static inner class to your adapter as your ViewHolder: RecyclerView.ViewHolder. Take a look at the following code:
public class SomeModelRecyclerViewAdapter
        extends RecyclerView.Adapter<SomeModelRecyclerViewAdapter.ViewHolder>{

    /**
     * A list of data that the recyclerview will display
     */
    private List<SomeModel> data;

    /***
     * Constructor to build the adapter
     * @param data the data to be displayed by the views
     */
    public SomeModelRecyclerViewAdapter(List<SomeModel> data) {
        this.data = data;
    }

    /***
     * Creating the view holder (only called the first time the view is generated)
     *
     * @param parent
     * @param viewType
     * @return
     */
    @Override
    public ViewHolder onCreateViewHolder(ViewGroup parent, int viewType) {
        View view = LayoutInflater.from(parent.getContext())
                .inflate(R.layout.model_item, parent, false);
        ViewHolder holder = new ViewHolder(view);
        return holder;
    }

    /***
     * "Binding" the data to the view holder
     *
     * This function is what informs a holder that it's data has changed (ie, every)
     * time the view is recycled
     *
     * @param holder
     * @param position
     */
    @Override
    public void onBindViewHolder(ViewHolder holder, int position) {
        holder.someModel = data.get(position);
        holder.bindData();
    }

    /***
     * Returns the size of our data list as the item count for the adapter
     *
     * @return
     */
    @Override
    public int getItemCount() {
        return data.size();
    }

    /***
     * The ViewHolder is our "Presenter"- it links the View and the data to display
     * and handles how to draw the visual presentation of the data on the View
     */
    public static class ViewHolder extends RecyclerView.ViewHolder{

        /***
         * A formatter to make our date readable
         */
        private static final SimpleDateFormat dateFormat =
                new SimpleDateFormat("yyyy/MM/dd HH:mm:ss");

        /***
         * The model (datum) CURRENTLY to be displayed by the view
         *
         * Note that this should be expected to change and the view will need to update to reflect
         * changed data.
         */
        SomeModel someModel;

        /***
         * A label from the view to display some info about the datum
         */
        TextView modelNameLabel;
        /***
         * Another label from the view
         */
        TextView modelDateLabel;

        /***
         * Getter for the datum.
         *
         * @return
         */
        public SomeModel getSomeModel() {
            return someModel;
        }

        /***
         * Setter for the datum
         *
         * @param someModel
         */
        public void setSomeModel(SomeModel someModel) {
            this.someModel = someModel;
        }

        /***
         * ViewHolder constructor takes a view that will be used to display a single datum
         * @param itemView
         */
        public ViewHolder(View itemView) {
            super(itemView);
        }

        /***
         * This is a function that takes the piece of data currently stored in someModel
         * and displays it using this ViewHolder's view.
         *
         * This will be called by the onBindViewHolder method of the adapter every time
         * a view is recycled
         */
        public void bindData() {
            if (modelNameLabel == null) {
                modelNameLabel = (TextView) itemView.findViewById(R.id.modelNameLabel);
            }
            if (modelDateLabel == null) {
                modelDateLabel = (TextView) itemView.findViewById(R.id.modelDateLabel);
            }
            modelNameLabel.setText(someModel.name);
            modelDateLabel.setText(dateFormat.format(someModel.addedDate));
        }
    }
}
Here are few things to notice about this sample. SomeModel is a piece of data (by “model” in this name, I’m referring to a data model as present in the Model, View, Controller pattern). The adapter I’ve created takes a list of these records as the data. In my examples, I’m using SugarOrm behind the scenes, but that shouldn’t be relevant to this demonstration.
R.layout.model_item refers to an XML layout. This layout represents a single listing of a SomeModel record within the RecyclerView.
I’ve also created a ViewHolder (extending RecyclerViewAdapter.ViewHolder). It takes a View in it’s constructor that it will use to display some data and has a SomeModel property (note the getters and setters) for a piece of data that will be displayed on the View. Note that I don’t take in the data as part of the constructor- this is to reinforce how the RecyclerView works: the View on the ViewHolder will never change; but, as the user scrolls, a new SomeModel instance may be passed as the data to display on the view.
So, what’s happening here?
When you create an instance of this adapter, pass some data and apply the adapter to a RecyclerView, the following happens: the RecyclerView starts generating enough Views to fill the available space on the screen. For each of these, it also calls the adapter’s onCreateViewHolder method to instantiate a ViewHolder. The function inflates the view using the given XML layout in preparation for some data and creates a ViewHolder to wrap the View. Note that the ViewHolder DOES NOT apply the data to the view here.
Next, the RecyclerView iterates through the data (using the getItemCount method to determine the end of the list) and displays the items currently visible by calling onBindViewHolder. In my example, I decided to be slightly less efficient and store the data item itself within the ViewHolder. Another way to handle this could have been to expose the TextView widgets that I wanted to use from the ViewHolder and set the text directly in the onBindViewHolder, rather than within the ViewHolder code itself. This code takes the data from our SomeModel instance and uses the View within the ViewHolder to represent this record visually.
As the user scrolls, Views that are pushed off screen are returned re-initialized with new data via the onBindViewHolder method and placed back into the RecyclerView on the opposite side.
Using the RecyclerViewAdapter in a RecyclerView
To use our newly minted adapter, we just need to create some data, instantiate our adapter, and apply it to a RecyclerView that is set up in our activity layouts. See the below code for an example:
public class MainActivity extends AppCompatActivity {

    EditText modelName;
    Button addModelButton;
    RecyclerView modelList;

    @Override
    protected void onCreate(Bundle savedInstanceState) {
        super.onCreate(savedInstanceState);
        setContentView(R.layout.activity_main);
        modelName = (EditText) findViewById(R.id.modelName);
        addModelButton = (Button) findViewById(R.id.addModelButton);
        modelList = (RecyclerView) findViewById(R.id.modelList);
        addModelButton.setOnClickListener(new View.OnClickListener() {
            @Override
            public void onClick(View v) {
                SomeModel newRecord = new SomeModel();
                newRecord.name = modelName.getText().toString();
                newRecord.save();
                setupRecyclerView();
            }
        });
        setupRecyclerView();
    }

    private void setupRecyclerView() {
        List<SomeModel> allModels = SomeModel.listAll(SomeModel.class);
        SomeModelRecyclerViewAdapter adapter = new SomeModelRecyclerViewAdapter(allModels);
        modelList.setHasFixedSize(true);
        modelList.setLayoutManager(new LinearLayoutManager(this));
        modelList.setAdapter(adapter);
    }
}
In the above code, when our activity is created we pull the RecyclerView from the layout with findViewById into the modelList variable. Then, on the setupRecyclerView method call, we grab a list of SomeModels, instantiate an adapter with them and apply that the adapter to the modelList object.
Note that we have to inform the RecyclerView whether it has a fixed-size and we have to give it a layout manager. Layout managers are a bit beyond the scope of this post; but, a time you might want something other than a LinearLayoutManager is when you want to display your data as a grid. See the Creating Lists and Cards Android documentation for more information on Layout Managers.
You’ll notice that I also set up an EditText widget and Button to create new instance of SomeModel and then update the RecyclerView. This is the most basic and obvious way to update a RecyclerView- by setting up a new adapter instance and applying it to the view.
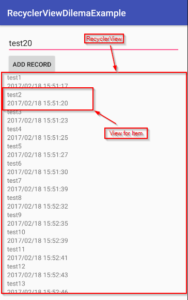
The result looks a lot like a ListView; but, it will perform better and affords more customization long term:
For completeness, here’s my model class SomeModel:
public class SomeModel extends SugarRecord{
    @Column(name="Name")
    public String name;
    @Column(name="AddedDate")
    public Date addedDate = new Date();
}
Additionally, here are my layouts for both the MainActivity and model_view:
<?xml version="1.0" encoding="utf-8"?>
<RelativeLayout xmlns:android="http://schemas.android.com/apk/res/android"
    xmlns:tools="http://schemas.android.com/tools"
    android:id="@+id/activity_main"
    android:layout_width="match_parent"
    android:layout_height="match_parent"
    android:paddingBottom="@dimen/activity_vertical_margin"
    android:paddingLeft="@dimen/activity_horizontal_margin"
    android:paddingRight="@dimen/activity_horizontal_margin"
    android:paddingTop="@dimen/activity_vertical_margin"
    tools:context="com.aaronmbond.recyclerviewdilemaexample.MainActivity">

    <EditText
        android:id="@+id/modelName"
        android:layout_width="match_parent"
        android:layout_height="wrap_content"
        android:layout_alignParentStart="true"
        android:layout_alignParentTop="true"
        />

    <Button
        android:id="@+id/addModelButton"
        android:layout_alignParentStart="true"
        android:layout_below="@id/modelName"
        android:layout_width="wrap_content"
        android:layout_height="wrap_content"
        android:text="@string/addModelButtonText"
        />

    <android.support.v7.widget.RecyclerView
        android:id="@+id/modelList"
        android:layout_width="match_parent"
        android:layout_height="wrap_content"
        android:layout_below="@id/addModelButton"
        android:layout_alignParentStart="true"
        />

</RelativeLayout>
<?xml version="1.0" encoding="utf-8"?>
<RelativeLayout xmlns:android="http://schemas.android.com/apk/res/android"
    android:layout_width="match_parent"
    android:layout_height="wrap_content">

    <TextView
        android:id="@+id/modelNameLabel"
        android:layout_alignParentStart="true"
        android:layout_alignParentTop="true"
        android:layout_width="match_parent"
        android:layout_height="wrap_content"
        />
    <TextView
        android:id="@+id/modelDateLabel"
        android:layout_alignParentStart="true"
        android:layout_below="@id/modelNameLabel"
        android:layout_width="match_parent"
        android:layout_height="wrap_content"
        />

</RelativeLayout>
Conclusion
While the Android ListView widget provided a lot of convenience when displaying a set of data, it did so at great cost to efficiency. The Android RecyclerView solves many of these problems, but requires a bit more care and feeding out of the box.
In my next post, I’ll cover more than just display. I’ll be covering how to update the RecyclerView to the latest data and how to handle users touching individual items within the list.